
TL;DR: Creating a blogging setup is challenging. The blog post isn’t about creating the blog itself. It’s about how to create a setup that has a CI/CD pipeline using Github and Netlify, lint your content with style guides like Microsoft Style Guide or Google Style Guide, and a cloud-based development setup with Gitpod.
Prerequisite
- Have a static site blog using tools like Astro, Gatsby, Jekyll, or similar.
- Node.js
If you don’t have a blog yet and still want to follow along, you can scaffold a project using Astro by running the following command in the terminal:
npm create astro@latestThe command will ask you some questions. Choose the following options:
- Where should we create your new project?: Choose any location you like
- How would you like to start your new project?: Use blog template
- Do you plan to write TypeScript?: Yes
- How strict should TypeScript be?: Strict
- Install dependencies?: Yes
- Initialize a new git repository?: Yes
Verify the project
Go to your blog’s directory and run the following command to see the project running:
npm run startYou’ll notice the following page when you open http://localhost:4321/ in the browser:

Deploy on Netlify
Now that we’ve our basic blog setup. It’s time to host it.
-
The best way to host the blog on Netlify is to have a git repository. Host it on any git hosting service like GitHub, GitLab, or Bitbucket.
-
Create your Netlify account at https://app.netlify.com/signup
-
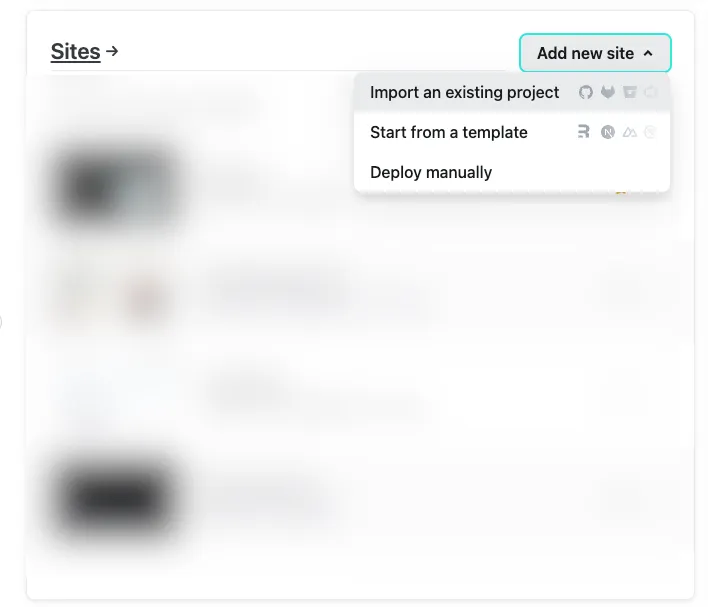
Create your Netlify project by selecting Add new site > Import an existing project and connect your blog repo as shown in the screenshot below:
-
The create wizard will have three following steps:
- Connect your Git provider: Select your git hosting provider. I’d personally use Github so that I can use Github Actions as well.
- Select repository: Select the repository of your code.
- Configure site and deploy: You can leave the default values. Netlify has sensible defaults.
- Finally select Deploy button at the end.
Netlify will start building your blog and, in the end, give you a web address where you can access it.
Consistent content style
If you’re writing a personal blog in 2024, it’s important that you make quality content. One way to do this is by following a content style guide. There are many good style guides out there, like Microsoft’s or Google’s.
Enforcing a content style guide on your content can be challenging. We’re human beings and not machines for a good reason. This is where automation can help. One such tool to lint our content according to a content style guide is Vale.
Follow the steps mentioned to get started with Vale for your blog.
1. Install Vale
The first step is to install Vale on your machine. Run the following command in your terminal based on your operation system:
# windowschoco install vale
# macOSbrew install vale
# linuxsudo snap install vale
2. Create vale config
Now, you need to create the Vale config file named .vale.ini in the root directory of your blog and add the following content:
StylesPath = .github/stylesMinAlertLevel = suggestion
Packages = Microsoft
[*.md]BasedOnStyles = Microsoft
This file configures the following:
- All content styles will be in the
.github/stylesdirectory. - All the alerts will be at least suggestions. There are many types of alerts, such as errors, warnings, and more.
Vale has built-in style guides available via
Packages. In our case, we’ll tell Vale to use the Microsoft style guide. You can also use Google and Redhat. - Finally, we’re telling Vale to lint all markdown files using the Microsoft package.
3. Download the built-in rules
Next, download the built-in rules based on the configuration. You need to create a directory called .github/styles where Vale will download all the styles.
Then run the following command to sync rules using your terminal:
vale sync4. Lint your content
At this point, you can test your markdown content with our downloaded Microsoft style guide by running the following command in the terminal:
vale path/to/file.mdYou’ll see the following type of content in your terminal:
src\content\blog\modern-coding-blog.md 23:3 suggestion Try to simplify this sentence. Microsoft.Semicolon 23:64 error Use 'isn't' instead of 'is Microsoft.Contractions not'. 23:103 suggestion Try to keep sentences short (< Microsoft.SentenceLength 30 words). 23:249 suggestion Verify your use of 'against' Microsoft.Vocab with the A-Z word list. 38:16 warning Try to avoid using Microsoft.We first-person plural like 'we'. 57:4 suggestion 'Deploy on Netlify' should use Microsoft.Headings sentence-style capitalization. 59:10 error Use 'we've' instead of 'we Microsoft.Contractions have'.5. [Optional] Github workflow
If you’re using Github and want to lint your pull requests automatically, you can create a file at .github/workflow/main.yml and add the following content:
name: reviewdogon: [pull_request]
jobs:  vale:    name: runner / vale    runs-on: ubuntu-latest    steps:      - uses: actions/checkout@v3      - uses: errata-ai/vale-action@reviewdog
It will lint your newly created pull requests automatically.
Cloud dev environment using Gitpod
I dislike setting up things again and again. If you’re like me, creating a cloud development environment for your blog will go a long way.
I prefer GitPod for my cloud setup. It gives me VSCode and other code editors to choose from and lets me bring all my editor configs along with it.
To onboard your blog that also has Vale linter, do the following:
1. Create Gitpod Dockerfile
First, we need to create a custom Docker image with NodeJS, Git, and Vale installed.
Create a file named .gitpod.Dockerfile in the root of your project and add the following content:
FROM node:20
RUN apt update && apt install -y git git-lfs sudo
RUN wget -O vale.tar.gz https://github.com/errata-ai/vale/releases/download/v2.28.0/vale_2.28.0_Linux_64-bit.tar.gz \ && tar -xvzf vale.tar.gz -C /bin/ vale
RUN useradd -l -u 33333 -G sudo -md /home/gitpod -s /bin/bash -p gitpod gitpodUSER gitpod
2. Create Gitpod config
Now, we need to create a gitpod config that does the following:
- Use our custom docker image
- Install our selected code editor extensions
- Execute the listed default tasks like running webserver
Create .gitpod.yml and add the following content:
image:  file: .gitpod.Dockerfile
tasks:  - name: Dev server    init: npm install    command: npm run start
vscode: extensions: - ChrisChinchilla.vale-vscode - astro-build.astro-vscode - esbenp.prettier-vscode3. Run blog on Gitpod
Finally, create an account on Gitpod and execute the following steps:
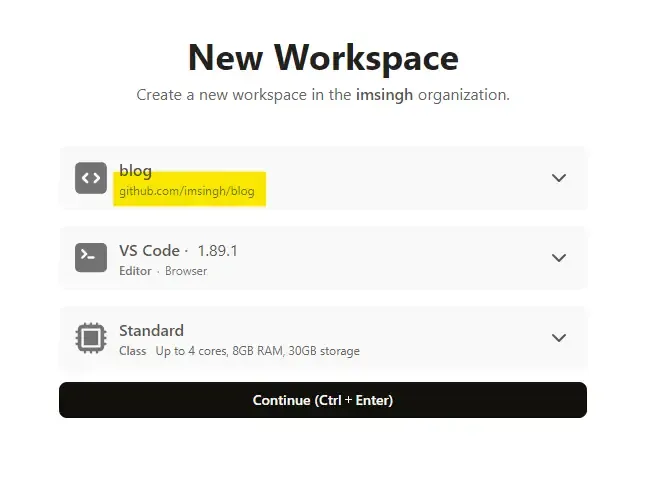
- Go to Gitpod Workspaces and select New workspace button.
- Select your blog’s repository, VSCode, and Standard VM class as shown in the image and select Continue.
Now, Gitpod will start creating your development environment. After that, you’ll see VSCode, where you can work like usual, write your blog, and commit it.
Summary
In this post, you scaffolded a project using Astro, deployed it on Netlify, Added linting using Vale, and finally created a cloud-based development environment using Gitpod. I hope this was useful for you.